Showing posts with label Home. Show all posts

Wednesday, January 27, 2010

Home Projects To Do List

Based off of my Home Projects Calendar I have very little time to make a list of the projects I want to complete in the year of 2010. I figured I'd better get started, so here we go.

1. Make a console table for basement - Something like this ...


2. Make an entertainment center for basement - Like this one that's a knock off from Pottery Barn's Logan collection


3. Make shower curtain for guest bathroom. - This is a work in progress. I will post when it's done, so stay tuned
4. Make curtain for guest bathroom - This one will match the shower curtain.
5. Find/Make curtain for office - Not sure what I want for this yet
6. Make surround for fish tank - Hopefully it will come out like this...
7. Paint fish tank base - Hopefully it will look like the center base above.
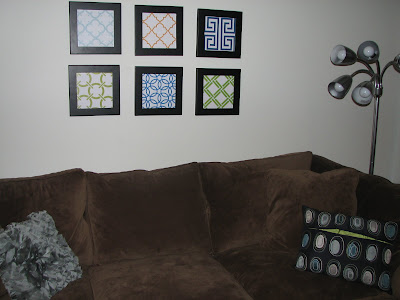
8. Find pictures for my new frame gallery in basement - I need something to fill these...

9. Fix shingles that blew off of porch yesterday
10. Redo front gardens
11. Redo back gardens
12. Make a stone patio with a fire pit
13. FINISH painting trim
14. Organize our master closet
15. Make a craft closet out of the guest bedrooms closet
16. Paint our master bedroom and bathroom


Well that's what I have for now. I'm sure that I will add a million things to this as the year goes on.

Tuesday, January 26, 2010

New Year ... New Plan

I love it when the new year rolls around and you find everyone putting out lists for what you should be doing all year long. I can't help but think, "Why didn't I do this all last year?" and kick myself in the leg. That doesn't usually work too well, but once I fall down I realize hey here's a brand new year to start fresh!  And I can very easily do a little bit each month to keep your house looking like this....


And not like this by the end of the year...


So Here's the list...

Home Projects Calendar: 2010
BY ALLEN NORWOOD
Charlotte Observer

January
Make a list of projects you plan to complete during the year. Include small but important chores so you won't overlook them, and big projects so you can budget ahead.
Post important emergency info: Locations of main gas valve, for instance, and contact numbers for heating and cooling services.

February
Organize garage or shed. Dispose of old paint, and properly. Around here we have the Sedgwick County Household Hazardous Waste Facility: 801 Stillwell, 316-660-7464
Clean lint from dryer exhaust ducts and vents.
Early spring is a good time for interior painting. (Uh-Oh, we've been doing this all year round. I guess we don't mind a little sweat)

March
Repair window screens and check screening on porches before bug season arrives. Save old screening for patches.
Build or repair fences and arbors.
Repair deck board; remove protruding nails and replace with coated or galvanized screws. Be sure to check and tighten bolts in deck supports.
Clean and seal wood deck as necessary. Deck stains with at least some pigment last longer than clear sealers.
Check foundation. If large cracks develop, call engineer.
Prepare an emergency kit for storm season.

April
Reverse ceiling fans - they should have been blowing upward during the winter and clean tops of fan blades.
Wash black streaks from roof. Use prepared cleaner (http://www.shingleshield.com/), or mix your own: Combine one part chlorine bleach with three parts water and a handful of trisodium phosphate. Apply to small section of roof with garden sprayer, let soak 20 minutes, rinse with hose.
Wash siding and gutters with similar solution.
Scrape and touch up exterior paint, pay special attention to window sills, gable vents, and garage doors.

May
Complete larger exterior painting jobs. Follow the shade - don't paint in direct sun - and quit before dusk so the paint can dry before dew forms. For most exterior jobs, look for 100% acrylic, and buy at least the "better quality".
Clean gas grill and replace any rusted or damaged parts.
Check crawl space for moisture and remove debris. If you spot signs of termites, call a pro.

June
Vacuum coils behind refrigerators and freezers to ensure proper operation.
Check supply hoses to washing machines. If hoses are soft or cracked, replace them.
Remove toe panel from front of dishwasher and check for leaks under the appliance.
Test GFCI circuit breakers, especially those that supply power to freezers in garages.

July
Be sure air conditioner's condensation drip tubes are flowing freely. If they're clogged, clear with wet/dry vacuum.
Trim shrubs away from heat pump compressors, and trim those blocking crawl space ventilation.
Flush water heater as needed. Be sure to turn off power before draining, and refill before restoring power.

August
Call heating service to schedule fall heating system checkup.
If you smell a musty odor during peak air-conditioning season, check ducts for leaks. Repair leaks with mastic - not duct tape.

September
Test smoke and carbon monoxide alarms and replace batteries.
Caulk around windows and doors. If you're going to paint, choose a caulk that's paintable. Pay special attention to places where dissimilar materials such as brick and wood meet.
Add weather stripping around pull-down stairs and attic access holes; insulate backs of panels.
Vacuum gas logs, and be sure they're properly seated before operating.

October
Add ne sweeps to the bottoms of exterior doors as needed to block cold air. Use a candle to determine whether drafts are getting through gaps.
Reverse those ceiling fans again. They should blow upward in the winter.
Clean gutters. Use hose to be sure downspouts are flowing freely; they can clog at bends.
If your water heater is warm to touch, and in an undeated garage or utility room, wrap it with insulated blanket. Be sure wrap doesn't interfere with pressure relief valve.
Check depth of attic insulation, and make sure loose insulation isn't blocking soffit vents; http://www.eere.energy.gov/

November
Drain and winterize irrigation system; the backflow preventer is most vulnerable.
Seal holes in foundation, especially spots around pipes and wires where rodents might enter. GROSS!

December
Create a fire escape plan for family and practice it. Be sure fire extinguishers are properly filled. Make sure household chemicals are out of reach of children. Post poison hot-line number near phone. The national hotline is 800-222-1222, which connects callers to local centers.

Well, there you have it. You can now take proper care of your house. Good luck following through with it, and hey if you fall short, there's always next year.

Monday, January 18, 2010

Party like it's 1999, Oh wait we're still in 80's

What that song is now over 10 years old? How? What in the world? Where did all of the years go? Our house is saying just the same. Our lovable house has finally came out of it's teen years and has now reached the big 2-0! Although most of us are able to change our own style as we become older, our poor house was stuck with waiting for its owners to do it for him. We heard that kitchens and bathrooms sell homes, and since we won't be living in this house forever, we figured we'd better do what we can to help out our stuck in the 80's old house. We finally took the punge and began to update one of our bathrooms. But bathrooms can get expensive you know, so we chose our smallest bathroom to get our feet wet. Our little powder room was the first thing to get our little mark.
Yes that's me reflecting in the mirror. Sorry I couldn't avoid that.

We have since changed out the toilet flusher with matching bronze handle as well. So our bathroom is now super happy to be back in the year 2010.

Sunday, January 17, 2010

Styling the Office

Does anybody have an office that seems like it's just a dumping ground for everything that has no other place to go? Well that is certainly how our office has turned out. And since we have our laptop that we haul around the house we don't go up to the office that often. When we do go up there it's usually a scene of Ben sitting at the desk, me sitting on the floor since we have to no other chairs up there, and Autumn finding something on the ground to use as her next toy. Well we are now on the move to creating a place where we would love to hang out, read a book ( that would be the day, I'm pretty sure Ben would die the day that he saw me reading a book), or maybe just get me off the floor. We finally found some handsome leather club chairs that we thought would look great in our office.


So I hauled Ben clear across town twice in a day to check them out and then again to haul them home. Here they are in all of their lovely glory. My lovely  husband was dreading and agonizing over the box stating "ASSEMBLY REQUIRED." Little did he know that it would take him all of about 10 minutes to simply screw on the legs. Well this is the start to hopefully a wonderful room that we will actually inhabit, instead of just a dropping ground for all of our things.


Tuesday, December 22, 2009

What To Do With My Basement: Finale!!!

Ever feel like you were in a cave? Well, you might have been in my basement then. It was a brown dirt color all over that did nothing but be a constant reminder that you were underground. Awhile ago I posted a group of basement moodboards when we were debating which color to cover up our cave like walls, and it was unanimous that we should wash away the dirt with Olympic's rain cloud. After only a week of painting I'm now able to show off our new basement!

It's SOOOO MUCH BETTER!!! Here you see my remake of my Crate and Barrel Pics, along with my recently updated lamp. I got this lamp my junior year in college and it used to look black with red lamp shades. I spray painted it using Rustoleum's chrome metallic spray paint. I was so happy with how it came out considering all of the floor lamps I had been looking at were so similar and were at a pretty penny cost and definately out of our budget.


Here is our bar down here.


And our Muhammed Ali punch out pic that we won on our honeymoon's Art Auction.

And my own creation of DIY canvas art here.

Here is our console table with our on the cheap holiday decor. The glass apocethary jars I got for $5 each at TJ Maxx ( a jewel in our city I never realized existed) and got the silver ornaments at Hobby Lobby at 50% off. The word art I made describing different places that meant a lot to Ben and I which I wrote about here. What is in that humongous shell you say? Well let me show you...


Why more shells! After painting my lamp I decided to DIY some silver shells that I saw for $10 a piece. So I dug out some old shells that I had and painted away, and now I have this.

Well that is my newly decorated basement. There's no more caves and only light and bright cloudy days from here on out.

Monday, December 14, 2009

A Master's Retreat!

We've done many things that have updated almost every room in our house EXCEPT our master bedroom. According to HGTV, that always seems to be the last place to be updated even though it's where we spend the majority of our time while at home. I've bought and returned about 10 different comforters. I just can't find the perfect one. BUT!!!! On our honeymoon we got some inspiration. While on our cruise we attended an art auction, mainly for the free champagne, but we were sucked in. The auctioneer educated us about the artists and the significance of the art that was being sold through out the afternoon. It was so interesting that we actually bought a piece! It was an autographed picture of Muhammad Ali getting punched out by some random person that ALMOST beat him. I know what your thinking, how romantic could a boxing picture be right above the bed. Well besides making me swoon, Ben just had to have it down stairs. Luckily, when we were telling them where to ship it, we informed them of the wonderous occasion that had taken place just a few days prior and they gave us a picture free!!! It was an Emile Bellet


I just love the colors of it along with the movement that he put into it. Every time I look at it, I just get taken away out to sea and fall back into our honeymoon state of mind. Now, what could be better inspiration for a master bedroom than our honeymoon. But what to do with it. It has such vivid and bright colors, I can't just throw all of those colors in there. It would look like a kindergarten went crazy in there. So I was stuck again... Until I found an amazing picture of what Candice Olson called "Caribbean Nights" !


I just loved the calmness that I felt when I saw this picture. Even though the bed is massive, the ivory bedspread felt light and airy ( the cloud background might have helped that effect a little as well). So I went looking for something that would give me the same feelings, along with something that wouldn't be the Candice Olson price.


I just loved this West Elm comforter once I saw it on my friend Kaylee's bed. I asked to steal her idea, and what else could she do since I let her steal my reception location for hers as well. The blue blanket I actually bought from Pottery Barn on clearance and had a monogram embroidered on it and the pillows. The chair is from Ikea, and the table from Walmart. I have the little flower votive holders on order from Zgallerie on clearance. I also ran out of work to go pick up two of the lamps from Pier 1 that were on clearance as well. The mirrored table is adorable, but haven't put in the order as of yet. I would definately have to get a better looking alarm clock. I wouldn't want to put my ugly white one on top of this beautiful table. I'm now on the hunt for a little rug that I could place under the chair and table along with a few extra decorative pillows. I'm thinking about pulling out my DIY hands and making a few of the pillows that are seen in the inspiration picture.

So there you have it! Hopefully our new master bedroom. I'll post pics once I start putting everything together. Stay tuned.

Thursday, October 22, 2009

What to do with my Basement?

I really love the space that we have in our basement, but it reminds you constantly that you're underground. The dark tan walls combined with very little light, well you might as well be in a tunnel. Our basement is split up into two parts our family room, and Ben's magnificent pool room complete with its very own pool table and wet bar.

Both of the spaces are separated but still open to each other, so I'd like to have them be some what unified. I think I'm going to have to do that with the paint color. Ben has been given free range of the Pool room and he decided that a K-State decor which would be cool. But that means that I had to find a wall color that would work for the blue and brown family room along with our purple and white pool room.

I found some inspiration from the amazing Candace Olson, who always does such sleek and stylish designs. I wanted to attempt to imitate her style minus the likely price tag that would have come with her. Candice changed a bachelor pad into a chic design that would fit the newlyweds she was working for.
With this room in mind I went to work creating a mood board for the family room that would hopefully bring in some of this chic-ness. I was able to figure out quite a bit of accessories that I liked, and now I'm down to picking the wall color. It's the hardest part for me.

OPTION 1:

You might recognize the pictures from a previous Crate and Barrel DIY project, but if you missed it it's here. This mood board has a very blue-grey wall color. I'm a little leary thinking that with this color on the walls, the basement might not get any brighter. With that in mind here is try 2.


OPTION 2:


This is a little lighter grey. That still has a hint of blue in it. I like this color, but I'm a little scared that it might coming out looking like a concrete room. Which I guess it is, being a basement, but we don't need to emphasise that. With that in mind I found some inspiration from Katie Bower's basement color that I found here.

OPTION 3:


I really like this color. It's got some yellow undertone, which keeps it on the warmer side. Yet it still in the grey family. Definately check out Katie's site to see a finished product of this color.

With these designs I certainly have my work cut out for me. I really like that chandelier that I found at Lowes along with the new color of the poker table. I'll have to use a gel stain and find a fabric to recover the chairs with before I can get it to look like this. If you remember when I first showed you our new poker table that we scored off of craigslist it needed some TLC. I definitely have some new projects coming out of this.

BUT... I first have to pick a paint color. If you have a favorite, let me know. I need some other opinions on this.

Tuesday, October 20, 2009

Finding Our Perfect Home

We were out looking for some inspiration this weekend, and actually found our perfect home. If only it wasn't $200K out of our price range, but we definitely found something to dream about. Ben and I love to go look at homes for sale; I guess to just figure out what we like and what we dislike. That gives us a better idea of which direction to take our current lovely abode.

Our local Parade of Homes is going on, and we were able to squeeze in a few hours to peruse the housing market. We wanted to find houses that were a little above the price range of our current home, but seem to be always drawn to the biggest and best looking house on the block. I mean who isn't. We walked into a house that didn't really impress us on the outside, but once we walked in the door, imagine this is what you see...

It was gorgeous!!! We loved it right when we walked in the door. The beautiful fireplace surrounded by that rich colored wood, right along with the HUGE floor to ceiling windows on either side. This room didn't have any lights on, and this is how bright it looked. We were drawn to the kitchen next.

The different type of counter top on the island added some amazing interest, and actually had a rough edge to give it a little something more. The beautiful white cabinets didn't even seem like they took up space they were so light and airy. One of the most amazing surprises was what was behind the kitchen. Not it wasn't the garage, like most homes in this area, we went back to find out and this is what we saw...

It was a hidden staircase, a couple more bedrooms, and a bath. I just loved how the staircase wasn't the first thing that you saw when you came in the door. And look at that chic chandelier, such a modern and elegant fixture. I'm definitely starting an inspiration book for the one lucky day when we get to build our dream home. I'm definitely going to be using some of this house's inspiration towards our current home.

Wednesday, October 14, 2009

Spooktacular!

We're still just getting our home decorated for year round decor, so I don't have much to make our home spooktacular for the month of October. Perusing the blog world I found some really amazing and easy things that would definitely deck your home out for Halloween.


These spooky labels that I found over at Kristine McKay Designs make the ordinary jars into some very interesting displays. You never know when your going to need some bat juice or mice dust to mix up your next dinner party.


A few books with these spooky labels lying around by your stash of elixirs will seal the deal for making your house ready for Halloween. Kristine will let you download these labels at her site.


A few grapes and cauliflower put in a small votive container with some dyed water and wax beads on top make some candles that look like you have your own collection of specimen jars.


And your Halloween decked house would not be complete without a grouping of bleeding candles on your coffee table. Sherry over at Young House Love did this creepy one. Do you feel like you're in a vampire's layer? I sure do.


I hope I showed some cheap and easy ways to make your abode spooktacular. Maybe next year I will have a chance to join in on the fun.

Tuesday, October 13, 2009

Try the Greener Side...And Save Money Doing So

I have a goal of only taking out our trash twice a month. It baffles me how two people in this world can come up with enough trash to fill up an entire trash can in a week's time. But we have been able to do it for quite some time now.

The plant that I work at is outside of town, and about a mile down the road is a truck reloading station for the big trash company. I never realized they had these before, but apparently while I was gone at college, our dump got full, and all of our trash gets shipped elsewhere to fill up someone else's dump. And we don't even live in that big of a city, comparatively. The reloading station is where all of the dump trucks come and transfer their load into a semi that trucks it out of state.

With the past few months' trash itching at me, I've decided that I need to figure out some alternatives to just trashing the dump, or in our case someone else's dump. So I've made few goals that I'd like to accomplish:

1. Make a compost bin

2. Start to recycle- without having to pay extra to do so
3. Only take our trash out every two weeks - This includes finding a company that does bi-monthly pickups
When I got the urge to start this I called our trash service to find out that they do not do bi-monthly pickups, and they will charge us to recycle. I guess that makes sense because the recycling truck drivers have to feed their family. But I came up with a better idea. Our Dillons has huge recycle bins in their parking lot that we could haul our little ones over to when they fill up. That will give us some free recycling, but I still am on the lookout for a new trash company that will do bi-monthly trash pickups.
The compost bin will be great come next spring when I plan on overhauling our gardens. This will definitely help out on having to pay for some good nutritious soil. I found a really easy tutorial online that told me how to make a bin out of some things that we already have in our backyard. You gotta love a free project. Stay tuned to see if I can pull this off and stick with it.
Any body else start to go to the greener side of life recently. I'd love to hear about some of them.

Sunday, October 11, 2009

Find Some Inspiration

I have had to try to be creative with my dining room as it is big enough to have a good sized table, but no other pieces. Since I can't have a big buffet or china hutch to display colorful nic-naks I was forced to find another way to bring some color into the room.


With that in mind I found loads of inspiration perusing the internet and flipping through decorating magazines. After months of looking I finally found something that I loved and thought I could do in my own dining room.


In the middle of the mirror is a framed menu (how appropriate for a dining room, huh). I thought that it might be fun to have one of our wedding mementos displayed here. I had a few copies of our wedding menu that we had at each place setting left over and why just throw them out when I spent so much time getting the design to be perfect. So stay tuned for some future dining room decor that will hopefully look similar to this.

Wednesday, October 7, 2009

Raise the Roof!

When we purchased our home 10 months ago we inherited a very pink room that the previous owners' two daughters shared. It was surrounded by a border of stamped on dragon-flies and ladybugs. They spent a lot of time making it nice for the girls, but a bright pink guest bedroom just wasn't our cup of tea. The constant badgering of every friend that came to stay with us just pushed us over the edge to finally tackle it. I got some inspiration from the kids over at Young House Love with their striped powder room.


I loved the chic-ness of the stripes especially the tone-on-tone. I found out the colors that they used and decided to switch it up from horizontal to vertical stripes. I also wanted to accent the main wall that you see when you walk into the room, which is the wall the bed was centered on. Ben and I took a three day weekend to tackle this project. Here's how it went down:

1. Paint the entire room with the darker tone ( since I wanted the warmer of the two tones surrounding the room). From my limited experience, if you are changing the tone completely it will take two coats to cover, along with primer.

2. Pick the thickness of the stripes. I decided that I wanted large stripes so I went with 10"


3. Bust out the good ol' tape measure and make three marks every 10" at the bottom, middle, and top of the wall.


4. Start tapin'. I put a big X where we were going to be painting and put the tape on the outside of the lines surrounding the "soon to be stripe"


5. Get to painting! Start painting the lighter color over the section marked with the X. It might take two coats to get rid of brush strokes.


And there you have it! A really cool accent wall that's not too much in your face. PS. It is SO true what they say about vertical stripe making you look tall. I feel like the room just got 10 foot ceilings! Well that's a little exaggerated, but we did just raise the roof in that room. What do you guys think?

Tuesday, October 6, 2009

New Place


As most of you know I got married almost four months ago. I had our entire guest bedroom full of wedding and shower gifts that we had received. I guess I didn't picture that inviting that many people meant getting that many presents. I'm not complaining at all. We received some amazing things to start our lives together. We never imagined being 23 and having more than what got us through our college years. With my mom's help we were able to find a place for just about everything that we received, but I found a few more things that I was at a loss as to where I should store. So after 4 months I finally took it off of my coffee table and made something functional and pretty.


Here is our wonderful new kitchen table that we picked up from Macy's. I purchased some wicker chargers from Walmart to keep me from just dropping my junk on the table as soon as we walk in the door. For the past week it has worked great making me keep it clear. But what was the wedding present that finally found its place?


Why it was this silverware holder that we received! It made a wonderful holder for a few silverware and napkins to be at easy reach for eating dinners. And it came out to look pretty good too. Has anybody else come up with some easy centerpieces lately?


Monday, October 5, 2009

DIY WordArt

As you can see to the right <----- Over there. I love to read many other decorating blogs. One of my favorite is Katie from Bower Power. She has given me lots of inspiration to make my own versions of her DIY art. One of my art and crafts projects was a version of WordArt that describes a special place for me. Katie made two different word arts that pull from the two states that she and her hubby are originally from, New Jersey and Tennessee.


Aren't they cool looking! I thought that they were so neat, and I figured they were pretty easy to make. I decided to try my nack at making one, but I wanted it to represent a special place to both Ben & I. I picked Manhattan,KS , where Ben and I met while attending K-State. I broke out the Microsoft Word and used my skills that I learned from writing a million lab reports back in the day. Here is how it came out...


It as definitely harder then I thought it would be to come up with that many places/things to fill up that small of a space.


While I wasn't doing homework we were able to enjoy some of these hot spots in the area. It also includes streets that we lived on, the highways that let you get into the valley, and even state facts. I decided to put this modern piece in our basement on our sofa table. What do you think?

I wanted to give everybody a little preview of a BIG future project that we just picked up.


This is our new poker/game/bumper pool table! We picked this baby up off of craigslist. We've had this empty space for quite some time waiting for an affordable option to come along. This might be a little bit before you see the finished product. I'm still debating on how I should fix it. I'll definitely be recovering the seats as they are pretty wore out, so that should be pretty interesting. It has some very cool woodwork on the top that I would like to still see, but I wanted to make it a darker cherry or espresso brown to match our tastes. I'm thinking about putting a gel stain on it to be able to still see the grain, but may have to resort to paint if I can't fix the scratches to be able to look natural. Any suggestions? Leave me a comment and let me know.

Wednesday, September 30, 2009

Crate & Barrel Art On A Budget

I have seen this grouping of geometric designs on Crate & Barrel's site for quite some time now, and have wanted something very modern like that for our basement. But $70.00 a piece was a little out of my budget. So I took a deeper look at them, and figured I could probably DIY these designs. The geometric shapes were very easy to make using word's auto-shapes.

They only took me about 10-15 minutes a piece. I took one of the designs to Hobby Lobby to try and find a square frame for them. I would have had to have it custom made, which came out to around $62 a piece! I couldn't believe it and figured their must be a better way. So I did what I do best, and started wandering around the internet. I was lucky enough to find these frames on Target's website for only $12 a piece.


A far better deal then Hobby Lobby, even on their 50% off days. I immediately ordered 6 of them to finish off this DIY art project. Here's how they came out...


I was even able to make the colors match the color scheme of the room. What do you think?

Monday, September 28, 2009

Where To Hide The Newspaper?

I've fallen in love with wicker baskets and boxes. They are such an easy and beautiful way to mix function with style.


I've been looking for ways to incorporate these into my home and I think i found the perfect places to start. Before I had a problem with the constant stack of old newspapers that we kept for future painting projects. Now we have a stylish way to store them along with a few pet toys and a laptop that never seems to leave the room. It gives an extra bit of texture to the space to make it interesting.


I got the basket at Michael's with my 40% off coupon. I also found a couple photo boxes at Hobby Lobby for $3. I put them up in our office to store quite a bit of random nik-naks that have to be in the office for use but aren't the best aesthetically like cd's and such.


Any body have any other ideas to keep are lives organized?

Sunday, September 27, 2009

Craigslist Find Made Fabulous!

We want our guest bedroom to be like a chic Paris hotel room. A mix of vintage and modern to make a incredibly luxurious and stylish place to get away. But as pretty much everybody is these days I'm trying to decorate our new house under a major budget. Craigslist is definitely a major help for kids like us. I found an incredibly gaudy gold mirror for $5 that I was able to see as something different. I got my inspiration from ZGallery with this mirror.
It is a very vintage Victorian design, but the black modernizes it to make it chic. After painting the gaudy gold frame a with a glossy black spray paint. It came out pretty close to the inspiration.


And here it is put up in the room. You can see our vertical stripes that we painted after being inspired by the kids over at Young House Love. What do you think? To vintage for you? Let me know.